Android Image Loading at SoundCloud
The SoundCloud Android app recently got a significant makeover: a “new year, new me” type of thing. Our remarkable design team and outstanding engineers worked together to revamp the way we display all kinds of images in the app, and I’m about to take you behind the scenes on this “glow-up” journey.
A Peek at the UI
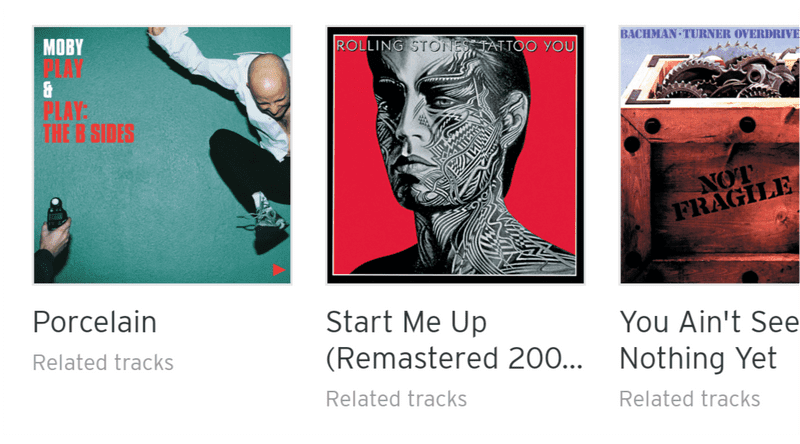
First, here’s a look at the user interface (UI).
We went from the old design:
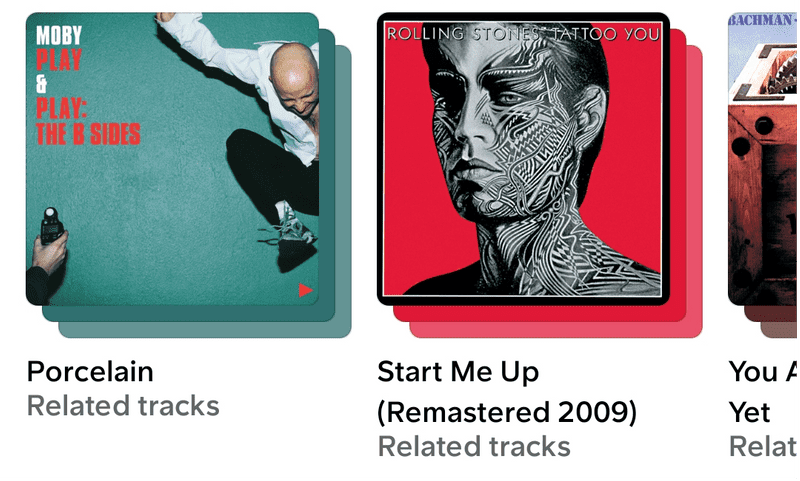
To the new design:
Below are some images you’ll come across while using the redesigned SoundCloud app.
Simple Track
This is a basic single image for tracks.
Playlist
This image is for a playlist. It has a background stack with colors picked from the playlist artwork.
Special Playlist
This image is for special playlists. It includes additional indicators, a blurred image stack, and a circular artist image.
These images look great, but as you might guess, they’re all backed by code, and the implementation wasn’t exactly straightforward.
“With great design comes great code!” —Someone’s uncle
From Design to Code Implementation
Want to know how we did it? This section will cover how we went from the design ideas to implementing them in code.
First off, all images now have rounded corners. This is thanks to ShapeableImageView, which supports rounded images.
Playlists show the main artwork and two images behind the main artwork, and each image has rounded corners. We accomplished this by creating an XML file containing a ConstraintLayout with three children of ShapeableImageView:
<ConstraintLayout>
    <ShapeableImageView id="stack2" />
    <ShapeableImageView id="stack1" />
    <ShapeableImageView id="playlistArtwork" />
<ConstraintLayout/>
We have some special types of playlists that can have additional overlays/blur or more images on top of the main artwork. For special playlists (see the Special Playlist section), we added another ShapeableImageView as an overlay to the ConstraintLayout with visibility="gone". If a playlist is “special,” the ShapeableImageViews visibility is changed to visible:
<ConstraintLayout>
    <ShapeableImageView id="stack2" />
    <ShapeableImageView id="stack1" />
    <ShapeableImageView id="playlistArtwork" />
    <ShapeableImageView id="playlistTypeIndicator" visibility="gone" />
<ConstraintLayout/>
For playlists, the primary colors of the main artwork determine the image stack colors. We used the [Android palette library][] to make this happen. It has a simple API that picks the primary colors from images, which we can use as background colors for the stack.
Additionally, images fade in when loaded. We use the PicassoDrawable, which crossfades the newly loaded bitmap with whatever image was previously loaded. To highlight the fade-in animation, the duration of the animation was set to 200 milliseconds.
Placeholders are displayed while the actual images are downloading, and com.squareup.picasso.Target provides a callback function:
fun onPrepareLoad(placeHolderDrawable: Drawable?)onPrepareLoad enables us to add a gray color to the stacks and a default image while waiting for the main artwork to load.
Loading and Displaying Images with Picasso
We use Picasso to load images. Picasso also offers a simple API, picasso.load(url).into(target), to download and cache images.
The image cache is used throughout the whole app so that an image in the cache will never download twice. Picasso can download or load an image from the local disk (cache).
Picasso is extendable for custom image loading operations. For example, if image loading fails, we want to display an error image. There are a few different ways to do that with Picasso. At SoundCloud, we have a custom ImageView that implements Picasso.Target.
Every time we load an image into the ImageView, we animate (fade in) the new image bitmap:
class ArtworkImageView : Target {
    override fun onBitmapLoaded(bitmap: Bitmap, from: Picasso.LoadedFrom) {
        animateBitmap(bitmap)
    }

    override fun onBitmapFailed(e: Exception, errorDrawable: Drawable?) {
        animateFailureBitmap()
    }

    override fun onPrepareLoad(placeHolderDrawable: Drawable?) {
        showPlaceholderBitmap()
    }
}
After implementing the redesign, the images looked fantastic, the design team approved, and the product managers were happy. But it came with a catch: Images were loading slower than before. The slow performance was visible while scrolling, and images flickered when moving between screens. The redesign had impacted image performance.
The following section will cover how we fixed the image loading performance.
Slow Image Performance Investigation and Fixes
We started debugging and discovered not a single culprit, but rather a bunch of issues that were contributing to the performance problem. We also investigated the app’s GPU overdrawing, which I’ll elaborate on later. The next sections outline the specific issues we encountered and how we fixed them.
Issue #1 — Palette LruCache
To generate the image stack colors, we use the Android palette library. To save time on regenerating the palette, we used LruCache<Bitmap, Palette> to store the bitmap and palette key-value pair for faster on-demand loading.
So every time we loaded an image, the code below executed:
if (isInCache(bitmap)) {
    return getTheCachedPaletteFor(bitmap)
} else {
    val palette = generatePaletteFrom(bitmap)
    storePalette(bitmap, palette)

    return palette
}
Using a Bitmap as a key, we retrieved the palette from LruCache. However, using bitmaps as keys to the cache caused a performance issue. Given that bitmaps are large objects, it’s best to never use them as keys to a Cache, Map, or any other data structure. This is because comparing bitmaps is time-consuming.
Solution #1
The fix ended up being simple. We switched from LruCache<Bitmap, Palette> to LruCache<String, Palette>. The String is the URL of the loaded bitmap, and comparing strings is quick and consumes less memory.
The code is below:
if (isInCache(url)) {
    return getTheCachedPalette(url)
} else {
    val palette = generatePaletteFrom(bitmap)
    storePalette(url, palette)

    return palette
}
Issue #2 — Palette Color Generation
To generate the palette colors from bitmaps, we used the code below:
Palette.from(bitmap).generate()The code is simple: It provides the bitmap and generates the primary colors for that bitmap. But palette generation takes time. It works by checking each pixel in a bitmap to find the most used colors. For example, if an image contains a lot of red, then the palette will contain the red color.
The bitmaps we use to generate the palette have a size of 500×500, which is large and slows the palette generation.
Solution #2
A faster way to generate the palette is to first scale down the bitmap and then generate the palette.
The palette has a function, resizeBitmapArea(size), that scales the bitmap down, so we went from 500×500 to 15×15. We also use maximumColorCount(colors) to find fewer colors, as in our implementation, we only needed the dominant color. By default, the palette finds 16 different colors.
The code below generates palettes faster, but the tradeoff is primary color accuracy, which is ultimately fine; shades of red are still red:
Palette.from(bitmap)
    .resizeBitmapArea(225) // Scales down the bitmap area to a 15×15.
    .maximumColorCount(6)
    .generate()
Issue #3 — Animating from the Placeholder to the Real Image
When loading images the first time, we displayed a placeholder and then displayed the actual downloaded image with a fade-in animation. Once the image was cached and the user scrolled through the RecyclerView, we still saw the fading in and out from the placeholder to the actual image, even though the image was cached.
Solution #3
To address this, we dropped animations for cached images. Luckily, Picasso offers the from enum, Picasso.LoadedFrom, together with the loaded bitmap. Picasso.LoadedFrom tells us where the bitmap was loaded from:
enum LoadedFrom {
    MEMORY
    DISK
    NETWORK
}
If the image was loaded from NETWORK, we animate the new image; otherwise, we display the image without an animation:
ArtworkImageView : TrackArtwork {

	override fun onBitmapLoaded(bitmap: Bitmap, from: Picasso.LoadedFrom) {
            if(from == Picasso.LoadedFrom.NETWORK) {
                animateBitmap(bitmap) // Animate from placeholder to real image.
            } else {
                showBitmapWithoutAnimation(bitmap) // Directly display image from cache.
            }
        }
}
Another minor tweak was that we made the fade-in animation faster — from 200 ms to 60 ms. 200 ms felt like we were showing off our fancy animations rather than benefitting the user by displaying the image quickly.
Issue #4 — Image Preloading in RecyclerView
Many screens in the SoundCloud app consist of lists of tracks or playlists, which means the user will scroll through the list to play a track. While the user scrolls, the new images are loaded and cached. Downloading new images takes time, so we thought it’d make sense to download and cache a few of the upcoming images in a list before the images of tracks/playlists are even displayed on the screen.
Solution #4
We preloaded the three subsequent images in RecyclerViews. If you use Glide, you’ll know it supports preloading images out of the box.
Since we use Picasso for image loading, we implemented image preloading based on Glide’s example.
When preloading items, we needed to consider the following:
- How many not-yet visible items do we want to preload? In other words, how many items did we want to preload? These items are always not visible until the user scrolls down to them.
- How many items are left to preload? We needed to check if we were about to reach the end of the
RecyclerView; for example, if we were always preloading the next five items and reaching the last bottom four items, we needed to stop preloading toward the end of theRecyclerView. - Make sure we don’t preload items twice.
- Only load items that aren’t yet visible on the screen. If we hardcode the preload size to 5 items but show 10 items, we end up preloading items that were already loaded.
Below is the ItemPreLoader class, which handles all the points mentioned above:
const val DEFAULT_PRELOAD_ITEMS_SIZE = 3

/***
 * The `ItemPreLoader` calculates which items should be preloaded.
 *
 * Items can only be preloaded when the conditions below are met:
 * 1. `preloadEnabled` is `true`, meaning that `PreloadScrollListener` has enabled preloading.
 * 2. `lastVisiblePosition` is larger than `0`. The first few items are already preloaded by the adapter, and if we try to load more items immediately, it could overwhelm the app's memory.
 * 3. `lastVisiblePosition` is smaller than `items.size`. We shouldn’t continue preloading elements outside the bounds of the list (`IndexOutOfBoundsException`).
 * 4. `startIndex` is larger than `lastPreloadedPosition`. Already preloaded items must not be loaded again.
 * 5. The list isn’t exhausted; there are more items. Same as 2.
 * 6. The last visible item’s `ViewType` must be the same as the `ViewType` of the item we’re currently preloading. Otherwise, we'll cause a `ClassCastException` if the `ViewTypes` are different. `getItemViewType(lastVisiblePosition) == getItemViewType(realIndex)` ensures we don't cause a `ClassCastException`.
 *
 * If the above conditions are met, `ItemPreLoader` slices the items list from the `adapterPosition`(`startIndex`) to the `lastIndex`(`startIndex + preloadItemsSize`) and calls `viewHolder.preloadNextItem` on those items.
 */
class ItemPreLoader(
    val preloadItemsSize: Int = DEFAULT_PRELOAD_ITEMS_SIZE
) {
    var preloadEnabled = false

    internal var adapterPosition = 0
    private var lastPreloadedPosition = -1

    fun <T> preLoadItems(
        viewHolder: ScViewHolder<T>,
        items: List<T>,
        position: Int,
        getItemViewType: (Int) -> Int
    ) {
        val lastVisiblePosition = max(adapterPosition, position)

        /*
            - `preloadEnabled` must be `true` to continue preloading items.
            - `lastVisiblePosition` can be set to `-1` if there are no items in the adapter. In this case, we don't want to preload items.
            - `lastVisiblePosition` can be set to `0`. We don't want to start preloading immediately when creating an adapter,
                and the adapter already loads the next item(s) to be shown.
         */
        if (!preloadEnabled || lastVisiblePosition <= 0) {
            return
        }

        val startIndex = if (preloadItemsSize < lastVisiblePosition) {
            lastVisiblePosition + 1
        } else {
            preloadItemsSize
        }

        val lastPreloadIndex = (startIndex + preloadItemsSize - 1).coerceAtMost(items.lastIndex)

        if (startIndex in lastPreloadedPosition until lastPreloadIndex) {
            lastPreloadedPosition = lastPreloadIndex
            var realIndex = startIndex

            items.slice(startIndex..lastPreloadIndex).forEach {
                if (getItemViewType(lastVisiblePosition) == getItemViewType(realIndex)) {
                    viewHolder.preloadNextItem(it)
                }

                realIndex++
            }
        }
    }
}
We also needed to set a custom OnScrollListener to the RecyclerView. The OnScrollListener:
- Enables item preloading when the user scrolls down.
- Disables item preloading when the list is idle or the user scrolls up.
- Finds the last visible item position in
RecyclerView.
class PreloadScrollListener(val itemPreLoader: ItemPreLoader) : RecyclerView.OnScrollListener() {

    /**
     * The scroll state can only have the following three values:
     * 1. `SCROLL_STATE_IDLE` is when the user isn't scrolling, and it enables image preloading.
     * 2. `SCROLL_STATE_DRAGGING` is when the user is scrolling with their finger on the screen, and it enables image preloading.
     * 3. `SCROLL_STATE_SETTLING` is when the user fling scrolls, and it disables image preloading.
     */
    override fun onScrollStateChanged(recyclerView: RecyclerView, newState: Int) {
        super.onScrollStateChanged(recyclerView, newState)

        when (newState) {
            SCROLL_STATE_IDLE, SCROLL_STATE_DRAGGING -> itemPreLoader.preloadEnabled = true
            SCROLL_STATE_SETTLING -> itemPreLoader.preloadEnabled = false
        }
    }

    /***
     * There's a special case where the user scrolls upward. In this case, image preloading is disabled.
     *
     * The `PreloadScrollListener` also sets the `ItemPreLoader.adapterPosition`.
     * The `LastVisibleAdapterPositionFinder` class grabs the `LayoutManager` from the `RecyclerView`, and from the `LayoutManager`, we find the last visible item position.
     */
    override fun onScrolled(recyclerView: RecyclerView, dx: Int, dy: Int) {
        super.onScrolled(recyclerView, dx, dy)

        if (dy < 0) {
            itemPreLoader.preloadEnabled = false
        }

        val position = findLastVisiblePosition(recyclerView)
        itemPreLoader.adapterPosition = position
    }
}
Finally, here’s the code to find the last visible item in the RecyclerView:
fun findLastVisiblePosition(recyclerView: RecyclerView): Int {
    return when (recyclerView.layoutManager) {
        is LinearLayoutManager -> getLastVisiblePositionFrom(recyclerView.layoutManager as LinearLayoutManager)
        else -> -1
    }
}

fun getLastVisiblePositionFrom(manager: LinearLayoutManager): Int {
    return manager.findLastVisibleItemPosition()
}
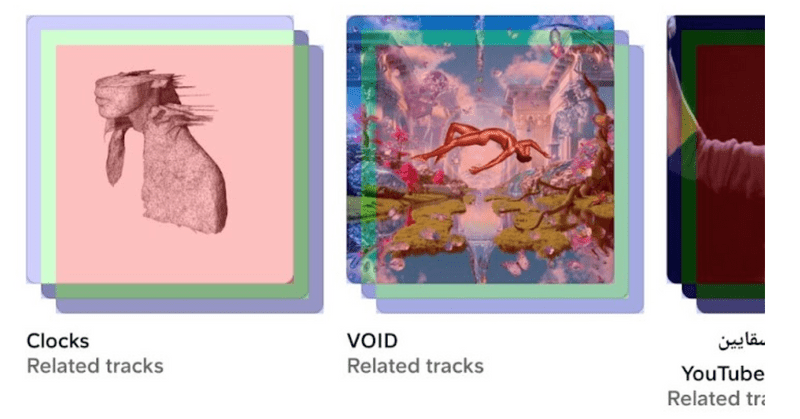
GPU Overdrawing
GPU overdrawing is when an app draws the same pixel more than once within the same frame. As a result, GPU overdraw visualization shows where an app might be doing more rendering work than necessary.
We caused a high overdraw severity because we were rendering/drawing three ImageViews on top of each other in the stacked ImageViews when displaying playlists. This is something we shouldn’t do.
The Issue
We draw three full images on top of each other, even though only 10 percent of the stacked images are visible. With stacks, 90 percent of an image isn’t visible, but it’s still drawn, which affects the frame rate.
To fix overdrawing, we would’ve needed to add a lot of custom complex drawing logic, which would take time to build, debug, and maintain. So the tradeoff here was unlikely to be worth the upfront effort and maintenance difficulties.
We did build the custom drawing logic, but it was too complex to maintain, and there was no performance benefit.
The main ideas were:
- Flatten the stacked
ImageViews into oneImageView. - Draw only the visible areas of bitmaps.
- Faster image drawing.
The code below draws three bitmaps on a custom view. Only the bitmaps’ visible areas are drawn, so as to avoid GPU overdrawing. Since only a subset (10 percent) of the bitmaps is drawn, drawing is now faster:
StackedImageView: View() {

    val visibleBitmapOffset = 40f

    override fun draw(canvas: Canvas) {
	// Show the bitmap area calculations.
	val bounds = RectF(0, 0, width, height)

	val paint = Paint()
       	paint.xfermode = PorterDuffXfermode(PorterDuff.Mode.DST_ATOP)

        canvas.drawBitmap(topStackBitmap, null, topArea(bounds), paint)
        canvas.drawBitmap(middleStackBitmap, null, middleArea(bounds), paint)
        canvas.drawBitmap(bottomStackBitmap, null, bottomArea(bounds), paint)
    }
}

private fun topArea(bounds: RectF) = bounds.copy().apply {
        right -= visibleBitmapOffset * 2
        bottom -= visibleBitmapOffset * 2
    }

    private fun middleArea(bounds: RectF) = bounds.copy().apply {
        top += visibleBitmapOffset
        right -= visibleBitmapOffset
        left += visibleBitmapOffset
        bottom -= visibleBitmapOffset
    }

    private fun bottomArea(bounds: RectF) = bounds.copy().apply {
        top += visibleBitmapOffset * 2
        left += visibleBitmapOffset * 2
    }
The code above calculates the bounds (area) of each bitmap. The bounds are the area into which the bitmap will be drawn. The visibleBitmapOffset defines how many pixels the bounds will be moved/offset.
- In the top stack bitmap area, the bitmap is displaced by
visibleBitmapOffset*2pixels toward the top-left corner. - In the middle stack bitmap area, all sides are moved by
visibleBitmapOffset/2pixels, placing the bitmap in the middle of the view. - In the bottom stack bitmap area, the bitmap is displaced by
visibleBitmapOffset*2pixels toward the bottom-right corner.
To draw only the visible bitmap areas and avoid overdrawing, we use paint.xfermode = PorterDuffXfermode(PorterDuff.Mode.DST_ATOP).
PorterDuff.Mode.DST_ATOP draws only the outside area of the following image. So if there is already something drawn in the view, then DST_ATOP only draws the outer part of what we’re drawing now. Since we already drew the top bitmap, only the middle bitmap’s outer part is drawn. It’s the same with the bottom bitmap; only the outer section is drawn.
The section above outlines the basics of how to draw three images without overdrawing. Complications arise when the images have round corners; the stacks can be solid colors; and there can be more images on top of the stack, fading in each stack of bitmaps and drawing rounded borders. Implementing all of that led to a great deal of drawing code, which was hard to maintain. Thus, it wasn’t included in the project.
If you want to learn more about computer graphics drawing, Fundamentals of Computer Graphics is a great book.
Conclusion
Redesigning an entire app takes a lot of time — from product managers coming up with the product specifications, whiteboarding sessions, and creating wireframes, to UI and UX designers drawing the final design. Finally, the engineers have to implement the new design and rewrite UI components, and usually, all this work is done under pressure with a set deadline.
We all like to go fast and get a redesign done, but as a result, we end up rushing and forgetting the important stuff like properly testing the new UI to see if it works, and checking to ensure the performance and frame rate are acceptable. Testing and measuring performance is the responsibility of the engineers, so it’s of the utmost importance to always test and measure the performance of your new UI.
With proper performance measuring and testing, we were able to identify and fix image UI issues we encountered. And although it took longer, SoundCloud ended up with a more polished product.


